
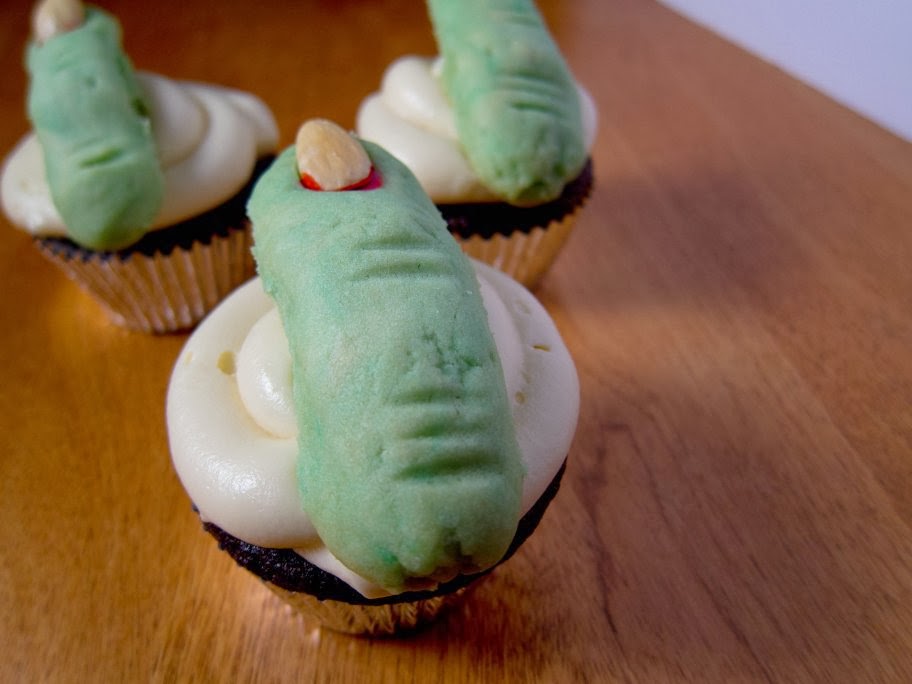
Only 356 days till Halloween! I meant type this up a while
ago, but didn’t get a chance. Even if you don’t feel like making Halloween
cupcakes in November (some nerve you’ve got), the cupcake and frosting recipes
are fantastic, and perfect for anytime you need a cake fix. This recipe is
compiled from the following 3 recipes:
Now, put on some Witchfinder General and
let’s get baking!
Cupcakes:
3 ounces chocolate (I used Ghirardelli 60% cacoa), chopped
1/3 cup cocoa powder
¾ cup hot coffee
¾ cup bread flour
¾ cup granulated sugar
½ teaspoon salt
½ teaspoon baking soda
6 tablespoons vegetable oil
2 eggs
2 teaspoons white vinegar
1 teaspoon vanilla extract
Preheat the oven to 350°F. Place the chopped chocolate and
cocoa powder in a bowl and pour the hot coffee on top. Whisk until smooth then
refrigerate for 20 minutes to cool.
Mix the flour, sugar, salt, and baking soda in a large bowl.
In a different bowl, whisk the oil, eggs, vinegar, and vanilla.
Add the oil mixture into the cooled chocolate mixture, and
whisk. Then add that mixture into the flour bowl. Whisk until smooth.
Ladle the batter into a muffin tin lined with cupcake
liners. It takes a bit less than ¼ cup for each cupcake.
Bake until the cupcakes are set and a toothpick inserted
comes out clean, 17 to 19 minutes. Cool the cupcakes on a wire rack for 1 hour.

Frosting:
½ cup (1 stick) butter, room temperature
8 oz. Neufchatel Cheese (1 package), room temperature
2 to 3 cups powdered sugar
1 teaspoon vanilla extract.
In the bowl of a mixer, mix the butter and cream cheese
together at medium speed for about 3 minutes, until very smooth. Scrape down
the sides of the bowl.
Add the vanilla extract and mix, then slowly add the
powdered sugar with the mixer on. Keep adding until the icing is the desired
thickness/sweetness.
Use a spatula to transfer the frosting to a piping bag, and
pipe onto cooled cupcakes.
 |
| Still haven't gotten the hang of piping |
Witch Finger Cookies:
1 cup (2 sticks) unsalted butter, room temperature
1 cup powdered sugar
1 egg
1 teaspoon almond extract
1 teaspoon vanilla extract
2 ¾ cup all-purpose flour
1 teaspoon baking powder
1 teaspoon salt
¾ cup whole blanched almonds
Green food coloring
1 tube red decorator gel
In the bowl of a mixer, beat the butter, sugar, egg, vanilla
and almond extracts. Add flour, baking powder, salt and green food coloring and
mix.

Wrap the dough in plastic wrap and refrigerate for 30
minutes. Meanwhile, if you need to blanch your almonds (do they sell almonds pre-blanched? If so, BUY
THOSE. I had to do it myself), add them to boiling water for 1 minute, the
strain and rinse under cold water. Remove the husks, which is SO MUCH FUN. In
theory the skins should slide right off, in practice, god speed.
Once the dough is chilled, time to shape the fingers. Grab
about a 1 tablespoon hunk of dough and roll it between your hands into a cigar
shape. Keeping the dough between your fingers helps give the ridges that look
like gnarly witch knuckles.

Use a toothpick to make creases in the fingers. Press an
almond into one end of each cookie. Line the cookies up on a parchment-lined
baking sheet.


Bake in a 325°F oven for 20 to 25 minutes, until they start
to turn pale golden. Let cool for 3 minutes. Lift the almond off each cookie
and squeeze red decorator gel into the nail bed. Press the almond back down for
the bloody effect.


